
PS3 Eye Camera Head Tracking Setup with OpenTrack
Set up head tracking with a PS3 Eye camera, OpenTrack and a Delanclip. You install the OpenPS3Eye driver first, then load our OpenTrack profile. No CL-Eye driver is needed.

PS3 Eye open driver Installation
This tutorial was created using a modified PS3 Camera which means the camera has an IR filter removed and floppy disk film applied, which is what makes the IR points readable.
If you have unmodified PS3 Camera, the results will not be that good or even completely prevent you from using it.
If you purchased the camera from us, it means you have the modified camera and there is no need to attach any filters on top of the lens.
Step 1: PS3 Eye Camera preparation
- WARNING: These drivers are for the PS3 Eye camera only. Do NOT install them if you own a DelanCam1. That camera is plug-and-play, it runs on the drivers Windows already ships, and nothing on this page applies to it.
- Before anything – please remove any existing PS3 Camera drivers from your PC by following this guide
- Rotate the camera lens anticlockwise to set the correct focus. (this is to zoom out view for better ir tracking)
- If you decide to use unmodified camera, make sure you have already fitted the 2 pieces of the transparent coloured film enclosed with the Delanclip on the top of the lens of your camera. Just to give you an idea, in this example we used a few very small drops of super glue and it held fine.
- Plug the camera into a USB port on the back of the motherboard, not a front-panel port and not a hub, because hubs lead to problems during driver installation. A USB 2.0 port is the safer choice, since USB 3.0 ports cause trouble on some machines. A USB extension cable is fine if you need one.
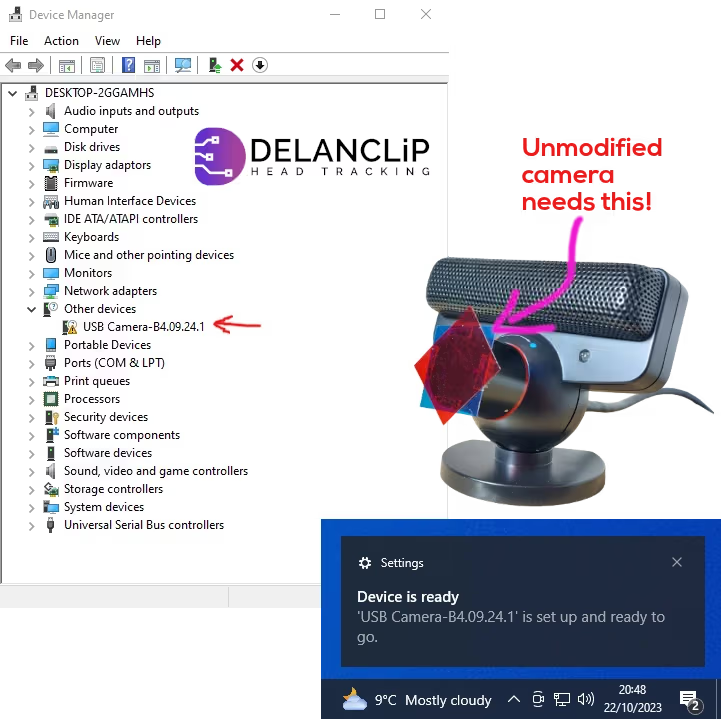
- Wait for the Windows to automatically install new device called “USB Camera-B4.09.24.1” if you don’t see this name in the device list – read this
- Please note, on Windows 11 you will not see the pop up window like on the screenshot.
- Attach the camera to your monitor using PS3 Monitor Clip (or if you don’t have it, use a hook and loop also provided in the package).
- Verify that the camera is listed in device manager
- open device manager by pressing Windows tiles and start typing: “Device”
- You will see the Device Manager at the top of the window
- The camera should appear in Other devices and identifies itself as USB Camera-B4.09.24.1
- If you don’t see this, Windows still has an old driver stored for the camera. Clear the stored driver first, then come back to this step.

Problems with installing PS3 Eye Camera in your Windows system?
Read our guide about how to troubleshoot PS3 camera driver issues.
Step 2: Install the libusbK Development Kit
- You must see the camera in the device list identified as “USB Camera-B4.09.24.1” with an exclamation mark. Without that state, the steps below will not work.

- Download the UsbK Development Kit
- Now very important installation procedure, make sure you will do everything exactly as we say here, otherwise it will not work.
- Double click on the downloaded file and press Next button
- On the following screen select “compact installation” from the dropdown list.
- On the next screen check the first 5 boxes as per our screenshot
- Follow with next button and finalize the installation.
- You will immediately see a new window popup. Follow to the next step – number 3

Step 3: The USB Inf Creator / Installer
- Select libusbK from the Kernel Driver Packages and press next
- Now you should see your camera listed in the Device Selection window. If you cannot see it, that means your USB drivers may be corrupted. You need to make sure that there is no other driver installed for PS3 camera in your system.
- Device configuration – just press next, nothing to change here.
- Select “Install Only” and press next
- Now the driver is installing, be patient and wait until it finishes its job
- Success. The driver installed correctly, so press Finish and move on to the OpenTrack installation below.



PS3 Camera Head Tracking Setup with OpenTrack
With the driver in place, set up OpenTrack to use the PS3 Eye camera.

Step 4: OpenTrack Installation
- Use OpenTrack 2026.1.0. It is the current release and it includes fixes for the PS3 Eye. Older builds from 2023.3.0 up will still run the Open PS3 Eye driver, but we no longer recommend them.
- Download Head Tracking Software and profiles:
- Save these files in any easy accessible folder for you
- Install OpenTrack (very easy – just follow the installation wizard)
Step 5: Custom Profiles Directory
- Run OpenTrack software
- Navigate to the profile dropdown menu
- Open configuration directory


Step 6: Adding an INI Profile
- We recommend to use 7zip and double click to open the Profiles Zip file.
- Now you can easily copy by using drag and drop from the downloaded ZIP to the OpenTrack configuration folder.
- Copy both files if you ever need to use face tracking – profile will be there for you.
Step 7: Selecting Profile
- Go back to the OpenTrack main window
- Select profile according to your product:
- Delanclip Fusion – USB-C.ini (Latest release of our flagship product)
- Delanclip Fusion – Micro USB.ini (Purchased before 2025)
- Delanclip Starter – Metal Clip.ini (Also found in Gamer edition)
- The profile is now selected, so move on to the next step.

Step 8a: Attaching the Delanclip Starter
- Here is a short video explaining how to attach Delanclip on your Headphones.
- It shows the Delanclip Starter, but the same principle is for the Delanclip Fusion with the difference that you do not bend it.
Step 8b: Attaching the Delanclip Fusion
Watch this short video for how to attach the Delanclip Fusion Pro. The same principle applies to the Delanclip Starter.
The placement shown is a starting point, not the only option.
Get creative, experiment with different velcro button positions, and find the position that suits you.
Final Software Tweaks
All the operations below must be done live, while watching the results on screen.
- Turn on Delanclip Fusion (or plug in the USB of the Delanclip Starter) and wear it on your head.
- Press “Start” on the OpenTrack main window (step 1 on the screenshot).
- If you experience issues with error message: “Error occurred while loading tracker PointTracker 1.1 Failed to open camera“
- Make sure your Camera is not blocked in Windows – here is how: How to Unlock Camera in Windows
- Point the Delanclip towards the camera, and hit the center button (default to HOME on keyboard)
- On the input (step 2 on the screenshot) – click the small hammer icon to access the options window.
- You should now see a very similar picture as shown in the screenshot.
- Adjust the threshold to fine-tune the points. This step is only required if your tracking points are faded or barely visible.
- You can also adjust the camera focus if your extracted points are faded or not bright enough by turning the lens. PS3 camera is a little tricky as it clicks to a set focus points. You can try to go somewhere in the middle – the lens will stay if you do it correctly – you may get much better results.
- When you reached the stable point tracking then you are ready to move on.
- Leave OpenTrack running and start your game.
- You are now able to look around using Delanclip.
- If you wish to center the view, press the “HOME” key.


In depth videos
For deeper insights into the mappings and advanced settings, we’ve created a comprehensive video below.
While these settings may not be crucial for beginners, you’re welcome to check it out if you feel like you need more information – watch the video below:
This step is optional. Use it if your camera is out of focus.
That's it.
You are now ready to play
The above steps are enough to get you into the head tracking world. There are more advanced settings available in the OpenTrack software. They allow configuring more than we covered above. We do recommend to go to the advanced settings when you get familiar with the software.
Our social channels are below.
There is also available more in-depth manual for setting up OpenTrack with your head tracker on the link below: